Vibrantes's avatar

Vibrantes

Nerd anime artist ●'β—‘'●
2.7K
Watchers
366 Deviations
68.8K
Pageviews

Update: APRIL 2024


🌸 COMMISSION STATUS: OPEN 🌸

🌸 INFO 🌸 ​ Commissions may take 2-4 weeks. ​ Payment method is 50/50 by PayPal invoice.


Prices below are for personal and commercial use.


I prefer to not take urgent requests. ​

🌸 HOW TO ORDER 🌸 ​ You can order by directly DMing me or reaching out at vibrantes.art@gmail.com. ​ When doing so, please send me the following info:


Brief explanation of your idea

Visual references of your idea

🌸 PRICE LIST 🌸

(Update 05/April) Vibrantes's Commissions 2024
Commission for @RuonVT
Commission for @(Anonymous Commissioner) BG Only
Commission for @RedPan_73
Commission for @RemnantLabs V2
Commission for @RemnantLabs (Sunset / Sunrise)
Omen
Cute Girl Random Portrait
Little Mage
Whimsical Portrait (Commission example)
Oswald, Odin Sphere fanart (Commission example 2)

Feel free to DM me or reach me at vibrantes.art@gmail.com


My website: https://vibrantes.carrd.co/

Join the community to add your comment. Already a deviant? Log In

Hey, guys! Long time I don't write a journal, I probably should update my old ones. XD


A friend of mine asked me how I made my photo into an anime-style illustration, so I thought of making a quick journal just to show my layers in case someone else is interested.


I didn't follow any specific tutorial, but my inspiration were anime movies who often use this technique to make their backgrounds, and I was trying to see if I could use it to make some quick webcomic panels. In a very quick summary: the technique basically consists of taking a photo, making things very high contrast and then shading it as if it was a normal anime illustration.


So let's get to it!


-----------------------------------

[Quick tutorial] Photo to Anime-style Illustration


Here is the original photo and the end result:

20201004 234655
Coloring Style Photo

Softwares I used: MediBang, Clip Studio Paint

Tools I used: mouse, polygonal/lasso tool, default soft brush


(disclaimer: I gotta confess this was meant to be just a quick study before going sleep, so I did it with all the laziness in the world. I took a half-ass picture with my celphone and edited it using a mouse because I was too lazy to grab my huion. I also just threw every layer on top of each other without a real thoughtful process. So please have in mind you probably can have a way more efficient process with better results than mine if you do it with proper care.)


PART 1: Fixes & Shading in Medibang


1.

Layer1 text MB

2.

Layer2 text MB
  • The modifications I did were just making my sketchbook look bigger and my mouse pad look like a sheet of paper. I color-picked the original colors of the photo and used the polygonal fill tool.


3.

Layer3 text MB
  • The Dodge mode gives a shiny contrast to light tones while ignoring dark tones. Like this I can make my light colors look flat while keeping some details in the dark colors.


  • Whenever I'm testing a coloring technique, I tend to use warm tones between yellow-orange-brown (sometimes pink), because it makes things look as if they are were being illuminated by sunlight. It's a quick way to make everything looks concise without needing to worry about color. But you can play around with any color palette you prefer.


4.

Layer4 text MB
  • You can be more careful in this stage and shade it as you are used to, it doesn't need to be as rough as mine.


5 & 6.

Layer5 text MB
Layer6 text MB
  • It may seem as it doesn't make much of a difference now, but subtle gradients does help a lot to make the final image looks unified. I add gradients considering the overall lighting direction in my image.


7.

Layer7 text MB
  • The Add mode gives an offuscating light effect to the image. I used a default soft brush to add light where the sunrays would hit the hardest.


Personally, I think the result already looks insteresting here, so you can stop here if you want. The reason why I move to Clip Studio Paint is because I like to add some textures and color adjustments layers, and CSP has better features for that.


PART 2: Textures & Color Adjustments in Clip Studio


1.

Layer1 text CSP
  • There is no modification here yet, we are just going to continue from where we stopped in Medibang.


2.

Layer2 text CSP
  • I used a layer in Darken mode here, but honestly I just cycled through each mode until I got a texture effect I was pleased with. So here you can just play around with the modes until you get something nice. It's nice to play with Opacity as well.


3 & 4

Layer3 text CSP
Layer4 text CSP

5.

Layer5 text CSP
  • Here I was trying some adjustment layers to see if I could get some nice different colors to the image. I first tried a Tone Curve adjustment. I wasn't liking much the results in the whole image, but I did like the results in the paper textures. So I cropped and masked the layer to affect only the notebook and the sheet of paper.


6.

Layer6 text CSP
  • In case it's not readable: H -32 / S -10 / L 73


  • Here I try to play with other adjustment layer called Hue/Saturation/Luminosity. With this layer, you can shift the whole hue of the image and make it brighter or dull. My intention was to get something close to a cute pastel aesthetic. But the only way I could make the whole image pastel to the point I wanted was to make it super illuminated. So I decided to leave it like this and just up the contrast with another layer above it.


7.

Layer7 text CSP
  • The Level Correction layer allows you to adjust the dark, middle and light gray tones separately. So with this final adjustment layer, I could up the contrast without losing the pastel effect.


Aaand that's it!


EXTRAS

The Wood texture I used

The Paper texture I used

A tutorial on how to add textures in perspective in CSP


------------------------


Putting the process into words make it seems super long and complicated, but you can actually do it pretty quick. Figuring out how to do things always take longer than actually doing it, so don't feel discouraged if it was supposed to make things quick but you are taking some time in your first try.


Also, I know there are a lot of tutorials, autoactions and filters to get similar results like this, so my tutorial may not be the most pratical, but I hope it could be helpful somehow!

Join the community to add your comment. Already a deviant? Log In
:iconprojecteducate:


Anime and Manga Week


Dave Brant-Bi by Vibrantes
My protagonist during concept phase.


During my journey to try to bring my webcomic to life, I have been extensively studying and focusing on cool action poses, interesting backgrounds and fancy shading... only to find that there’s nothing more frustrating than not being able to draw your own characters properly. 

Let’s face it, as much as acquiring any fundamental skill will help you in the long-run, in the end your characters are the heart of your story and nothing will happen without them. In order to tackle my biggest issue, I have accumulated tips, tricks, and folders of tutorials that I’ll summarise here for other webcomic artists in training.


DISCLAIMER: I consider myself an intermediate artist; my art is far from perfect even with these helpful tips. Even so, I do encourage you to experiment and test these out and see if they work for you! Do be aware that all the characters shown here are works in progress for my webcomic, and that they belong to me.


So let’s get to it!


1. THE CONSISTENCY TRIAD: EYE-NOSE-MOUTH


1-triad Brant-Bi by Vibrantes 
The measurement to rule them all!


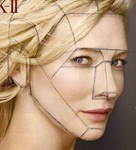
There are many elements that make up a character design and make them unique from one another, but under all the details of cool clothes, crazy hairstyles and shiny eyes, if we were to reduce the main elements that repeatedly make them look the same (for good or for bad, aka Same Face Syndrome) are the measurements between eyenose and mouth.

Even if you drew the head slightly bigger or your front face doesn’t accurately 3D-translate to your profile face, if the eye-nose-mouth measurement is the same, your character will be read as the same character without disrupting the narrative or even being noticed at all.


Now, it’s still possible to create two different characters with similar measurements without causing Same Face Syndrome, but we will talk more about that further. For now, this will be our starting point!


So here is a quick list of guidelines from simple to complex that you may use to get used to your character’s measurements:
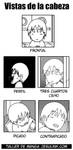


 1.1   TRIANGLE

Sometimes trying to guess by eye how our characters should look like in perspective can cause some gruesome errors making them look completely different as soon as they turn their heads. It's very easy to get a little confused by all the details that you have to put in the right places, but one way to make it a little easier is using guidelines with simple shapes. You can easily use a triangle to better visualize how your character's features should fit in their faces. Like this, instead of having to track where all the details should sit in perspective, you only need to track the triangle's shape. It doesn't take away the need of knowing basic foreshortening and perspective, but the amount of information one must keep track of is definitely reduced.
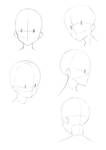

1-1-Triangle Brant-Bi by Vibrantes


1.2   PLACEHOLDERS

Another approach that I find more intuitive is simply replacing the eyes and nose with simplified placeholders. It's much easier to control the spacing between circles and squares than of an already detailed eye. The smaller amount of information also helps you to better visualize the overall shape of the head.


1-2-Placeholders Brant-Bi by Vibrantes


Since this is the one I use, here is a super quick step-by-step on how I use it.


1-2-Placeholders2 Brant-Bi by Vibrantes


1.3   THE SMILEY FACE

If you want to summarize the info even more, sometimes just a simple smiley face is all you need to get a sense of the overall shape of the head and spacing between facial features.


1-3-SmileyFace Brant-Bi by Vibrantes


1.4   THE BEE

When I began my studies, I realized I would always make the chin too long or too short, so I started marking the chin with some guidelines (I thought it made the drawing looks like an insect, so I called it a bee just to sound cute haha... It's probably an ant, though). Later I replaced it for two circles but based on the same thought.


1-4-The Bee Brant-Bi by Vibrantes


1.5   REAL SKULL (Sort of)


If you are having a hard time picturing your character in different angles, making studies based on real skulls can give you a good 3D sense of the face. You can find further references on this in the end of this article.


1-5-RealSkull1 by Vibrantes


2. AVOIDING SAME FACE SYNDROME


 3-SFS Brant-Bi3 by Vibrantes
Same measurements should not mean same visual impact!


There is much discussion about the extent to which Same Face Syndrome can be considered an artistic flaw, or a narrative flaw, since your reader would struggle to differentiate one character from the next. The discussions tend to range from consolidated style and practicality to even lack of skill or creativity. It’s not the intention of this article to discuss this further, but as the tips herein are a reflection of the problems I tried to tackle for my own comic, I need to at least state briefly my opinion.

I personally think that different characters bring a lot of richness to the narrative, and these stories tend to be the ones I resonate the most with. However, I do think that practicality is a very convincing argument in this matter, specially when considering any type of sequential art. Even so, I would still argue that it is quite possible to have the best of both worlds. It's true I do not have yet the skills (nor the assistants...) to achieve a character roster as diverse as Kentaro Miura in his work "Berserk", but I'm usually satisfied if I can keep my characters simple but yet with a visual impact of their own.

So here are a few tips on how to keep it practical yet interesting on your characters roster.


3-SFS Brant-Bi1 by Vibrantes

3-SFS Brant-Bi2 by Vibrantes

As I have stated above, the facial elements I usually change are hair, eyebrows and eyes, but this is just my personal choice and you don't need to feel limited to that. You can feel free to try out different nose shapes, chin shapes, ear shapes or even mouth shapes depending on your style.

If you need a rule of thumb, the more elements you change, the more space you have to be subtle, and the less elements you change, the more drastic these changes will have to be. Whenever I'm running out of ideas for different shapes, I simply search for something like "weird eyebrows" in Google. It will give you... very weird stuff, but it certainly will enlight your creativity.

You also totally shouldn't restrict yourself to only age groups as I did, these "category measurements" are meant to aid as it fits in your story. You can also consider things like body type, character importance (maybe the important ones have different measurements from non-important ones?), character's beauty (maybe the beautiful ones have different measurements from the... ugly ones?), characters' race (maybe you want your elves to have very peculiar differences from your humans? Or maybe you want to keep consistency on a race you have created?), and the list can go on and on. Only your story (and you as an author) can tell what kind of category would make things more pratical to you, or even if you need them at all!


                                3. GENERAL ADVICE AND FURTHER REFERENCES AND LINKS


3.1  WHAT I HAVE LEARNED:


[-] Study real anatomy. 

Every style out there is nothing more than a stylized reduction of the real thing we see everyday. Studying only the style you intend to go for is like pretending to know a whole book only by reading its summary. It can only get you so far, because as soon as you need to go deeper in the subject, you won't know what to do. If you are good at character consistency in certain angles but not others, there are high chances you don't know the anatomy of the head well enough, don't be ashamed to re-study it whenever you need it.


[-] Your character consistency doesn't need to be 100% accurate to start your story. 

I have talked with a few artists on how they deal with character consistency specially when you intend to have a big roster, and most of them agreed that usually around 70%-80% similarity is enough for readers to not feel bothered about or even notice at all while they are engaged in the story.


[-] Draw older characters. 

Although drawing characters of any age will obviously be helpful to improve your art, I would specifically suggest to try drawing older ones because, unlike children, adults have a much more defined facial structure and generally require more knowledge in anatomy to make them look believable. If you know how to draw older characters, drawing younger ones will later feel easier.


[-] Draw different styles. 

Every style has their on approach on how to reduce facial features and I found that trying out other styles increased greatly my ideas when drawing anime characters. Besides, you can easily take their ideas and later "manga-fy" them to suit your style as you need.


[-] Start with characters you're not very attached to.

Most of the times we have very strong concepts on how our protagonists should look like and it can feel 10x more frustrating when we don't have the skills yet to draw them exactly as we want. So try beginning your studies with side-characters or just completely random ones so you can focus solely on making them look consistent and not on making them look cool.


5-AdvicesReferences1 by Vibrantes


3.2  FREE AND PAID LESSONS THAT HELPED ME IN MY STUDIES:


*Ctrl+Paint (free):
Exaggeration (how to exaggerate realistic features)

*Proko (free):
How to Draw the Head from Any Angle (Andrew Loomis method)
How to Draw the Head from Extreme Angles (Andrew Loomis method)

*News Master Academy (free/paid):
The Structure of the Head with Steve Hudson Part 1 (this was released as free sample in Youtube)
The Structure of the Head with Steve Hudson Part 2 

*Aaron Blaise (paid):
Drawing Human Anatomy

*Skillshare (paid):
How to Draw The Head From Every Angle by Nina Rycroft - Part One
How to Draw The Head From Every Angle by Nina Rycroft - Part Two
How to Draw The Head From Every Angle by Nina Rycroft - Part Three


3.3  TUTORIALS BY OTHER ARTISTS:

Here I have selected some of my favorite tutorials by other artists that have helped me greatly in my studies!

(Click on the links to see the original)


*FACE:
5b7a296e0d431a252a75103d918768fa--anatomy-referenc by Vibrantes       7fd634343587f3d9451fb331810b7e98 by Vibrantes    52c15efc244e1643efee71af365c4e51 by Vibrantes   288ut01 by Vibrantes    8677 443232642536874 4567932850469064890 N by Vibrantes 
         [By Proko]       [By SD Kay*]     [By WMA]        [By Gina Vila]     [By Seiichi Nakamura]

  Angle-of-the-head-v5a-300 by Vibrantes      Construction A by Vibrantes       Dibujo 01 a by Vibrantes         E6c11fa19d6d1f329a6f075490a5a98a by Vibrantes          8325487b3cf4c784ef367d7c8d73adf3 by Vibrantes
    [By Proko]                [By Pete Emslie]   [By Jesulink]       [By Wysoka]     [By たまにお       

Designing1pg2 by Vibrantes         FAC heads by Vibrantes      70434bb1fe5bbbf99d3df87c7601473d by Vibrantes
[By Brian Lemay]   [By Albert Dorne]        [By Innao]

*HAIR:

2643c8faa537cc4a075f56d2f874d002 by Vibrantes    9d80e31ce1e4d4fdc582fba91957c33d by Vibrantes  Ff16b54ce2e7bf0fd7ff47803a1fcb64 by Vibrantes  6117f6e83ac7521819e4ca284e9df95a by Vibrantes  consTut shape02 by Vibrantes
        [By WMA]              [By Fira's Art]            [By Fira's Art]           [By Anyeka]       [By Vanilla Waffles]

7359a59f8d8b96b66fbe4aa32de6f7c8 by Vibrantes  92642389ab8c5772ea9afa854719b25c by Vibrantes  D7uhxxc7PHs by Vibrantes
   [By drag0nia]    [By Circus-Usagi]         [By γˆγ³γ‚‚]


4. FINAL CONSIDERATIONS

                                
Even though I’m writing all these tips trying to help other people and I consider myself a fairly dedicated student (heck, I consider myself a full no-shame try-harder!), I still see all the flaws in my art, so it’s important to always have in mind that studying/practicing is something that takes time to pay off. So be patient and roll up your sleeves, because you have some characters to bring to this world!


Have fun!

-Brant-Bi


Join the community to add your comment. Already a deviant? Log In
Hey guys! Llama Emoji-22 (Waving) [V1] 

It has been some time since my last resource recommendation, but now I finally had some time to sit down to write part 2! In this part, I would like to recommend some of my favorite channels and websites to listen to Podcasts while drawing!

For those who may not be familiar with them, Podcasts are basically just chats, vlogs and interviews in which someone discuss their thoughts, opinion, ideas or experience on a subject. Many artists, both professional and hobbyists, enjoy doing Podcasts to others in order to help people with the inner and external struggles of making art, so Podcasts are not only very informative but also GREAT MOTIVATORS.

Summarizing: Artists making art while listening to other artists talking about art.

So if you have been feeling down lately, just need an interesting background noise to get your creativity juice flowing better or just want to be informed about the Art world without having to interrupt your practice time, I hope the following Podcasts can help you!


-------------------------------- MY PODCAST LIST --------------------------------

SOUNDCLOUD


Subjects: Art in general, Motivational talks and Interviews with famous artists

This is one of my favorite podcasts ever, hosted by the artist Andy J. Pizza [Miller] . Andy is a super passionate and ultra happy guy XD that just can't talk about art without overflowing his love for it, he is a professional artist that decided to create a podcast channel for those who would like to turn their passion into a business without feeling they need to become robotic salesmen selling empty art. Andy also loves to talk about the laws of the universe and positive thinking, how to stay true to yourself and how to cope with frustration and anxiety while making art.


YOUTUBE


Subjects: Art in general, Motivational talks, Live QA streams, Interviews with famous artists

Bobby is a veteran in the Art world, owner of his own studio, Imaginism Studios, and founder of the online school Schoolism. Bobby is a very happy guy that offers both informative and motivational Podcasts for those who want to get into the art industry or just improve themselves as artists. He also makes interviews with famous artists where they tell their story on how they got where they are, and live QAs where he answers his viewers' questions about Art.


Subjects: Art in general, Motivational talks, Personal vlog, Being an illustrator for childrens' book, Teaching art, Freelancing

Will Terry is a brutally honest yet very kind and inspiring artist that created his Podcast channel in order to share his personal thoughts, life and experience as both an illustrator and art teacher, and his personal failures and success while trying to be good at art. Growing as a teen that used to draw really bad and no one believed in to becoming a professional illustrator and art teacher, this guy definetely has A LOT to share with you!   


Subjects: Informative podcasts about Art careers, Freelancing, Concept art and Design

A side from his great tutorials, Feng Zhu also offers a series of Podcasts where he talks VERY IN-DEPTH and HONEST about how to pursue and get an art career as concept artist and what this industry is all about for both Games and Films. He talks about what to improve in your portfolio, how to make contacts and so much more, even if you are just a hobbyist (like myself) I would still recommend his series to understand how the professionals improve their art to then apply it into your personal project. Unfortunately, he stopped posting them for a while, but you can still check all his stuff.


-------------------------------- MISC --------------------------------

NOT REALLY A PODCAST, BUT...


Subjects: Fiction, Novels, Writing in general, Creating Characters, Self-publishing

Jenna is a self-published writer that loves to create exciting action stories. Perhaps her videos wouldn't necessarily be called Podcasts, but she shares A LOT of information and ideas on how to create better stories, worlds and characters. I also know that most of the podcast I just recommened were mainly about visual art and not writing, but if you are aspiring to be a manga/webcomic artist (like myself!), you know that comics are nothing more than a fusion of both visual and storytelling, and this girl DEFINETELY has a lot to help you with storytelling! Also, Jenna is just a super funny, cute and honest person that you just won't get tired of listening to her for hours. But of course, as her videos are not meant to be podcasts but general tips, her videos are quite short in comparison, but you can just leave her playlist playing.


WHAT ARE THESE PEOPLE TALKING? SPANISH?

- Brazilian Portuguese channels:


Subjects: Art in general, Art career, Freelancing, Comics and the Brazilian comic market (also offers direct drawing tips and product reviews!)

CrΓ‘s Conversa is the youtube channel of Editora CrΓ‘s, a brazilian comic publisher run and founded by Thiago Spyked in conjuction with other artists and writers to give opportunity to national comic authors to reach the market and publish their stories. Thiago created CrΓ‘s Conversa youtube channel in order to incentivate and help other aspiring comic book artists, and give insights about the Brazilian comic market as a whole for those who seek and believe just like him that we can bring more and even greater national titles to the Brazilian audience. His work "Spectrus: Paralisia do Sono" recently won Best Title of 2016 and you can find some of his artworks right here in DA: :iconthiagospyked:


Subjects: Art in general, Motivational talks, Interviews, QAs

ICONIC is an art network founded by Henrique Lyra in order to assist aspiring artists, both professionals and hobbyist, in their art jorney. It offers courses, interviews and workshops with renowned Brazilian artists throughout the year and has recently created a youtube channel in order to directly answer QAs and help their viewers' find their art path. Henrique is a professional artist and incredibly warming person that will definetely make you feel you can conquer it all with his super goofy pirate metaphors! XD

-------------------------------------------------------------------------------


And that's it! I personally have many more, but these are definetely my favorite ones and I hope they can help you feed this big passion for creation that we artists share, or perhaps even help you find it again!

So don't give up and keep drawing, my friend! Llama Emoji-22 (Waving) [V1] 
BB.
Join the community to add your comment. Already a deviant? Log In
Hey guys!  Llama Emoji-22 (Waving) [V1] 
*[This is the first time I ever wrote a journal, so sorry beforehand if I ended up doing something wrong. Big Fool Emoji-03 (Creep Stare) [V2] ]

Today I would like to share some of my favorite YouTube art channels and other great websites with lessons and tutorials that I often use during my studies, in case any of you would like some recommendations. Nod I put together with it a description of what I think of them and more or less what they are about, but you guys can read it or not, it's OK Llama Emoji-66 (Orly) [V3] 


YouTube Channels:

Proko

Main subjects: Realistic anatomy, shading and tips

Desc: Proko is one of the best channels out there if you want a more technical approach to your anatomy studies. Realistic anatomy may seem quite of a heavy subject at first for beginners, but Proko teaches in such a fun way with his silly/bad puns personality and sinthetize the content so well, that you just ended up not only learning quite A LOT but also having fun in the process.

------

Alphonson Dunn

Main subjects: General, inking, watercolor, realism

Desc: Alphonson was definetely the artist that made me lose the fear of inking, he's very good at not only showing to you how to make nice textures and volume, but also explaining the whole thought process behind it so you can feel the confidence to do it yourself. Although teaching inking is his trademark, he also teaches other general drawing fundamentals such as anatomy, shading and perspective.

------

:iconmarkcrilley:
Mark Crilley

Main subjects: General, anime/comic, realism, tips and talks

Desc: I'm sure a good chunk of you all out there know this one, the guy has 2.5 MILLION subscribers afterall, haha! But for those of you who don't, although Mark doesn't give super technical tutorials per se, he offers really GREAT follow-alongs and comic creation tips that just teach you a bunch!! Not to mention that Mark is just such a funny, laid back goofy guy that you just don't get tired of hearing him ever! XD

------

:iconsycra:
Sycra

Main subjects: General, art/drawing fundamentals, tips and talks

Desc: Sycra is a very humble artist and quite of a shy nice guy that not only shares his knowledge but also his art journey. His tutorials are not only super enlightening but also very easy to understand. But one of the things I really like from him is how he shows to us that even your favorite artists have their own inner struggles when approaching their own art and that you're not alone in this, you feel that not only you have a great online teacher but also a company in your journey.

------

:iconrobertmarzullo:
Robert Marzullo

Main subjects: Comic creation, anatomy, digital painting

Desc: Robert Marzullo is a chillout guy that will give you the push you need to start your comic! Although his style is mainly focus on western comics, his knowledge in comic creation and action will definetely help you in absolutely any style your comic (or manga!) may have. There's nothing that I find more important for an action manga than dynamic poses, and Robert will just make it look so easy that you will definetely want to draw along with him and lose the fear of trying it yourself!

------

:iconablaise:
Aaron Blaise


Main subjects: Animals, animation, digital painting

Desc: Say that Aaron Blaise worked 21 years for Disney in many big classics such as "Lion King", "Beauty and the Beast" and so many others would probably suffice for his description, honestly XD. But what really stood out for me in his videos is that he not only has a great knowledge but he also knows how to pass this knowledge very well, I was expecting a videotutorial of a super famous animator to be full of techniques that me as mere mortal would just have a hard time following along, but Aaron makes his video with so much passion that he will definetely be able to take you a long in his thought process.


Other Websites:

Ctrl + Paint


Main subjects: Digital painting, general art tips

Desc: Although Ctrl+Paint mainly focus on digital painting (and I'm more of a traditional artist), the free video gallery is just full of general art tips that can help you a lot in any kind of media, but aside from that, this guy is a GREAT teacher, and can teach you something completely new in only 5 minutes, really.

------

Skillshare (Paid, 0.99 USD first month)

Main subjects: MANY, like MANY!

Desc: Skillshare is a website that offers a ridiculous amount of lessons that can vary from 30 mins to 2 hours about any given subject you can think of, from comic to photography, design, caligraphy (and much more) from real professionals from Pixar, Disney, famous online artists and many more. The website allows you to watch the introduction of any lesson for free for you to know what they will be about and your first subscription will cost you only 0.99 USD (can be paid with PayPal) and then the next months will be something around 8-12 dollars depending for how long you want it to be.


And this is it! Honestly I have many others, but I feel they are more personal than general (and also this list would simply be eternal Llama Emoji-38 (Confused) [V2] ) so I focused on the ones that I feel that most helped me. For the second part of my Resources recommendation, I'll be focusing on Podcasts for those who love to hear other people talking about Art while drawing!

Hope it helps! Llama Emoji-22 (Waving) [V1]
BB.
Join the community to add your comment. Already a deviant? Log In
Featured

Commissions 2024 [OPEN] by Vibrantes, journal

[Quick tutorial] Photo to Anime-Style Illustration by Vibrantes, journal

Character Consistency - A Massive Tip Collection by Vibrantes, journal